Making Hollow Forms
© 2008 Alan Dunwell (Last Mod: 04/17/2008)
The following is a design for making hollow forms is a simple rig that uses a router to cut the dished out curvature. This design is not my own, but I picked it up somewhere and modified it for my use.
All images may be seen in greater detail by double-clicking to get the full resolution images.
Initial Design:
Basic Concept:
Almost all of my jigs and templates and such start our using rough materials with the idea that once I refine the design I'll make it up using birch ply and varnish it and brand it with my logo, etc. Somehow all that later stuff never happens, I end up with iteration number eleven-D2 that works really well, and then I use it forever. The second aspect is to keep costs low, often using scrap from dumpsters and whatever is at hand for those initial designs. One hopes that others might start with better materials from the get go since the design is pretty well finalized.
The idea is to make a carriage on which the router will ride over the disk that will become the hollow form. By moving the router it will cut out the curvature in the disk as it is rotated below the router. In order to make it versatile I designed it so that different curved rails can be swapped in/out to provide the desired curvature of the dishes. For my purposes I made 15', 20', and 25' dishes, where the listed distances are the radii of the curvature of the dishes.
Construction of the Base Jig:
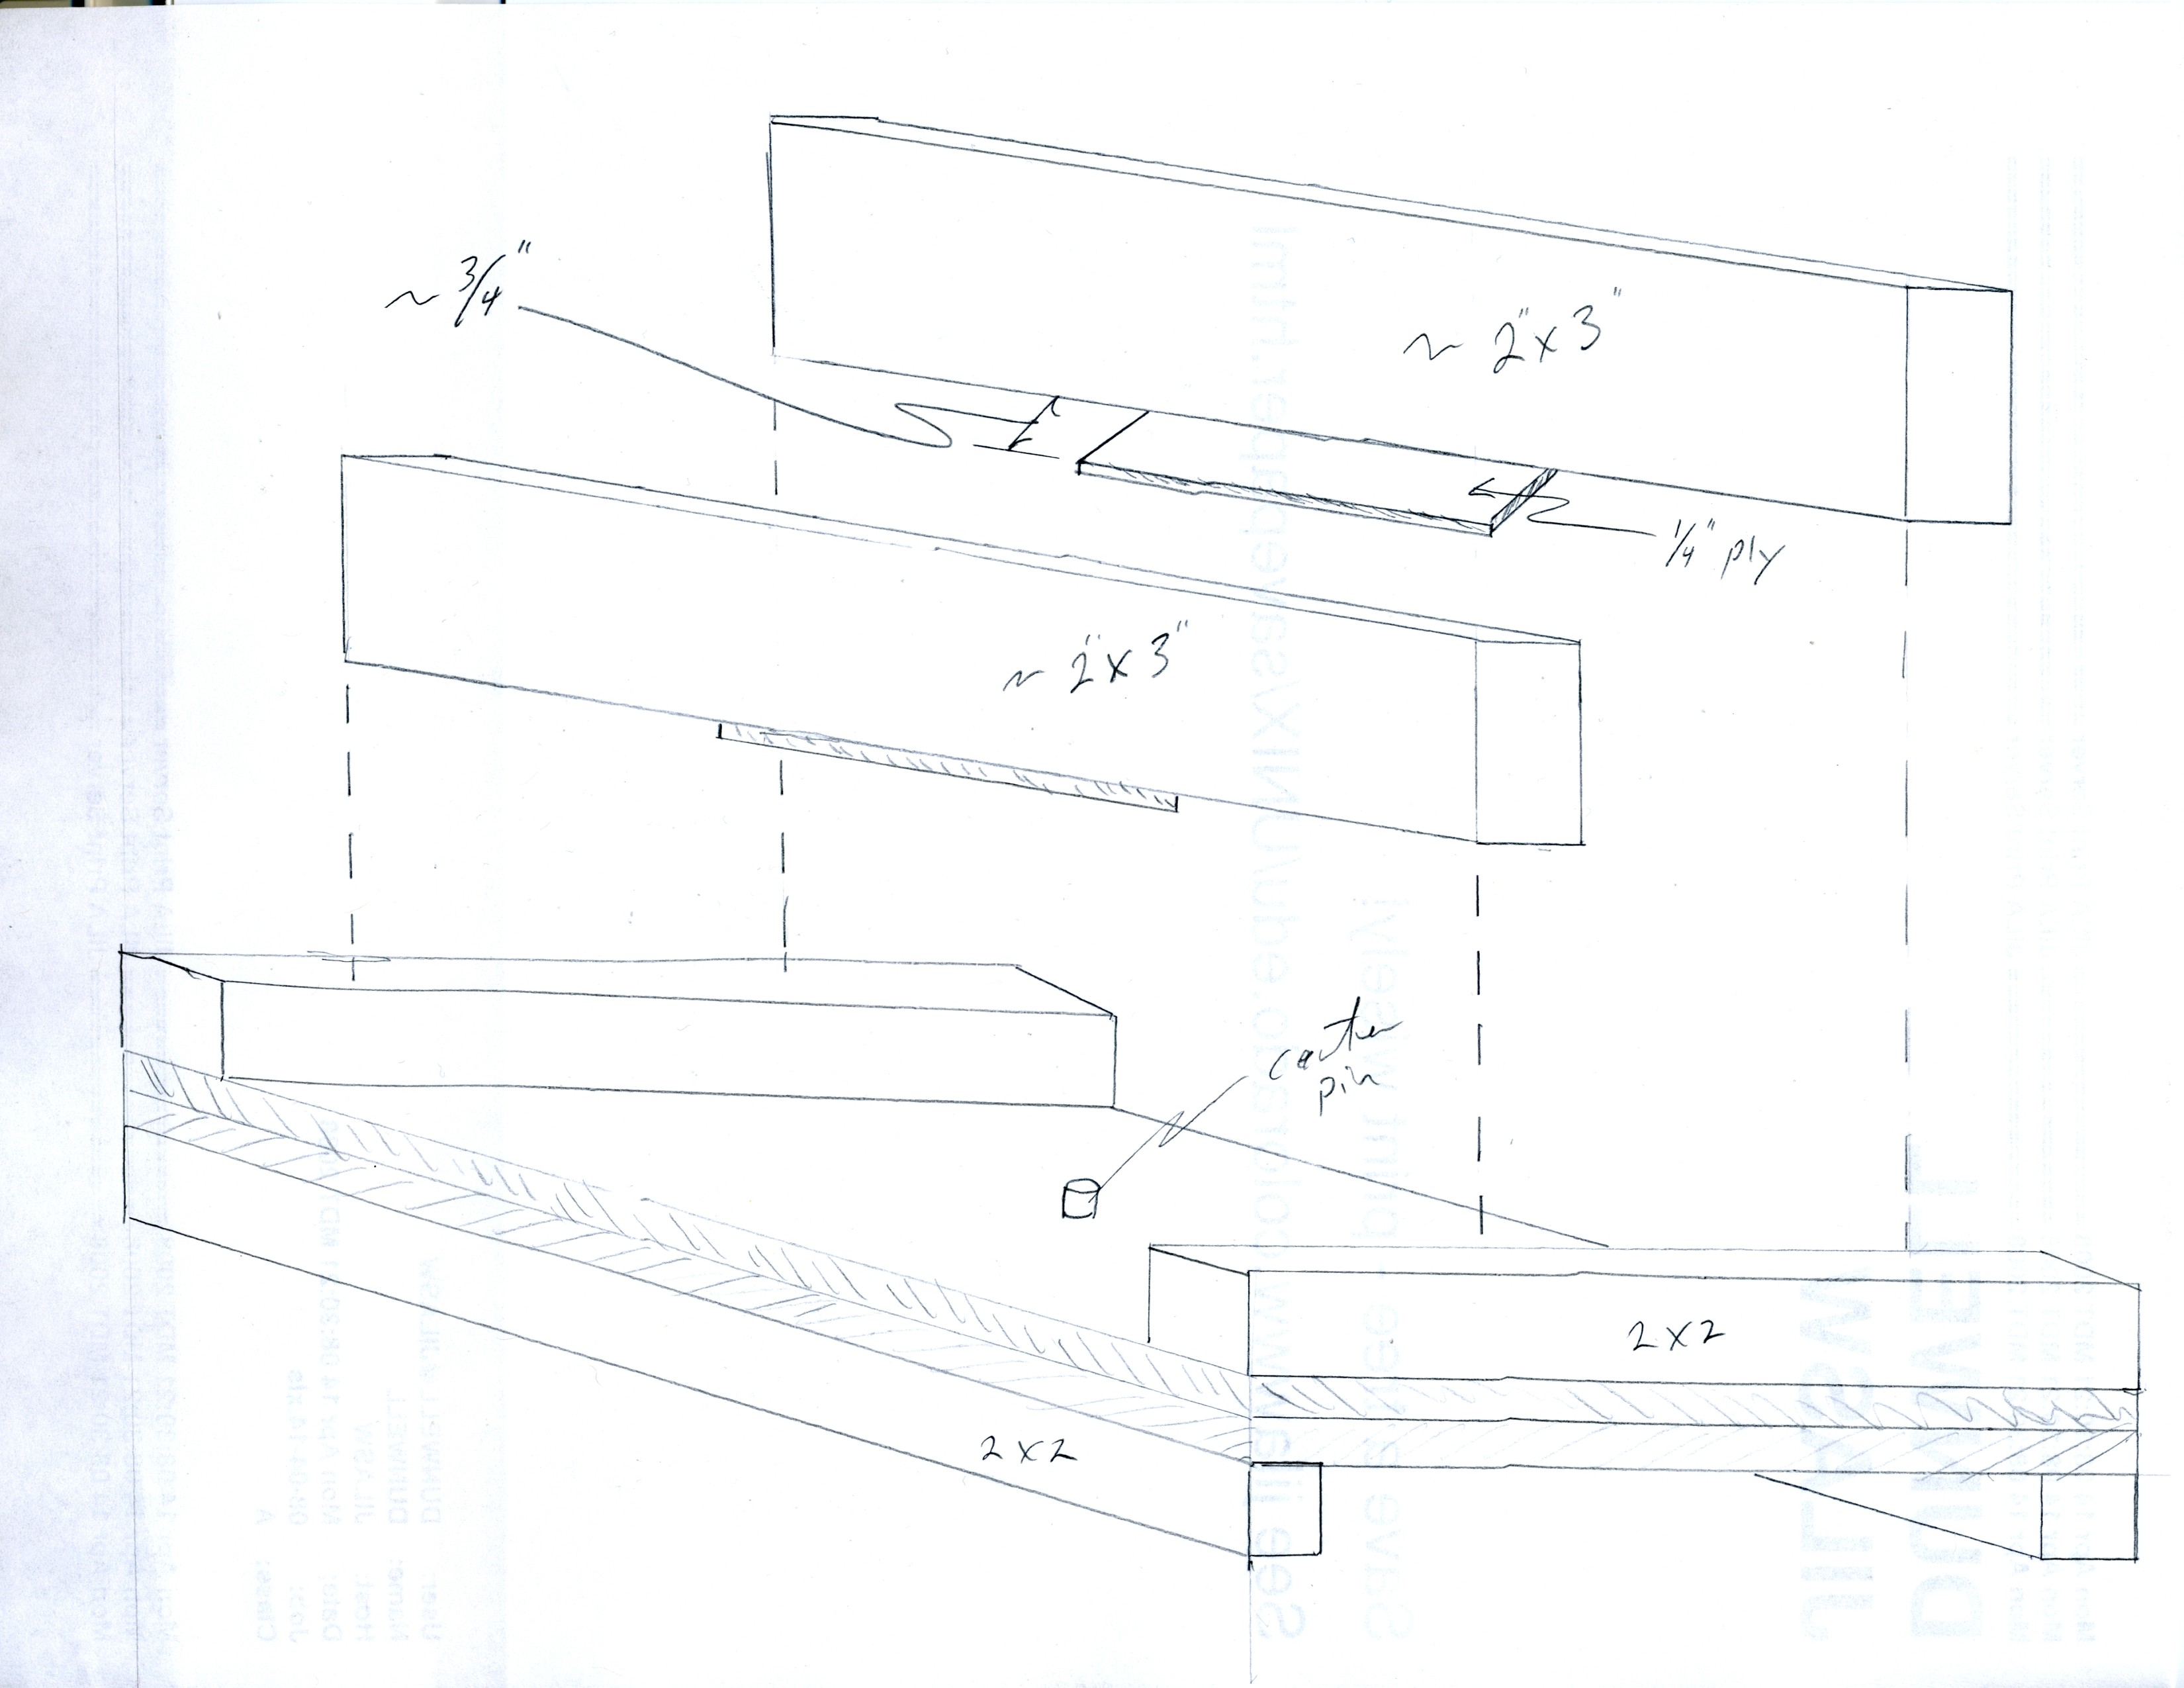
I did not make a detailed plan layout for you here, I think you can design that for your own needs. The basic design is very simple, here is a rough drawing of everything but the radiused rails
and here are some photos of my rig showing the placement of the rails as well. How you attach your rails is up to you, I use both horizontal and vertical screws with different rails, all they have to be is stable in the vertical dimension so that they don't flex when the router is slid back and forth.

There is a base piece of heavy plywood. I suggest that you use two layers rather than the one that I used. Notice that I have some metal shims at the edges to compensate for some warpage that happened later, you want to avoid that. The space inside the end cross supports should be long enough to allow your sized rounds to fit. I use 2' diameter rounds so the space inside is about 2' 2", so add another 4" for your 2x2s on the ends. On the bottom I attached some 2x2s for feet and these also help to stabilize the plywood and keep it flat. Going horizontally at the ends I put cross supports of 2x2s. This gives enough height to allow the insertion of a 3/4" round of MDF or plywood over the center pin. If you plan to make all your rounds double thick you may want to make these end cross pieces higher. The rail-support/router-guide overhead pieces are a 2x6 that was split and trimmed down to give me a bit more height than a 2x2 and to make sure they didn't flex. Make the spacing to match your router base and locate them on center to the base board and your center pin location.
You want to be using a good full sized router, not just a laminate edge trimmer. I use a Porter Cable 1.5hp unit. Notice that I added in some 1/4" ply in the center bottom to help support the rails where they are thin. Originally I had made the rails thicker and screwed them to the rail-supports at the center. The problem was that then the router bit was not long enough to reach to the depth needed. I didn't like the idea of using a 3/4" long bit so I re-designed it with thinner rails with the thin supports to accommodate a standard 1/2" length bit. The center pin is a small piece of aluminum tubing that I had at hand and is held in place in a hole with machine screw through the base board. Select a center pin that will match one of your drill bits closely and make it at least 1/4" in diameter. Don't make it too tall, 1/4" or 3/8" is good, or else the router bit will hit it on the short radius forms.
Makiing the Rails:
In order to design the rails it is necessary to lay out the curve for the rails. One could do this with a string of the length of the radius tied to a pencil, but that is getting kind of iffy out at twenty-five feet. It makes more sense to use that algebra that we were told in 7th grade that we'd need later in life. Well, OK, maybe Mary-Sue didn't need it. There is a nice discussion of how to do this on David Hurd's site at http://www.ukuleles.com/Technology/calcarc.html along with a lot of other good Left-Brain Lutherie stuff. My calculations led me to the following:
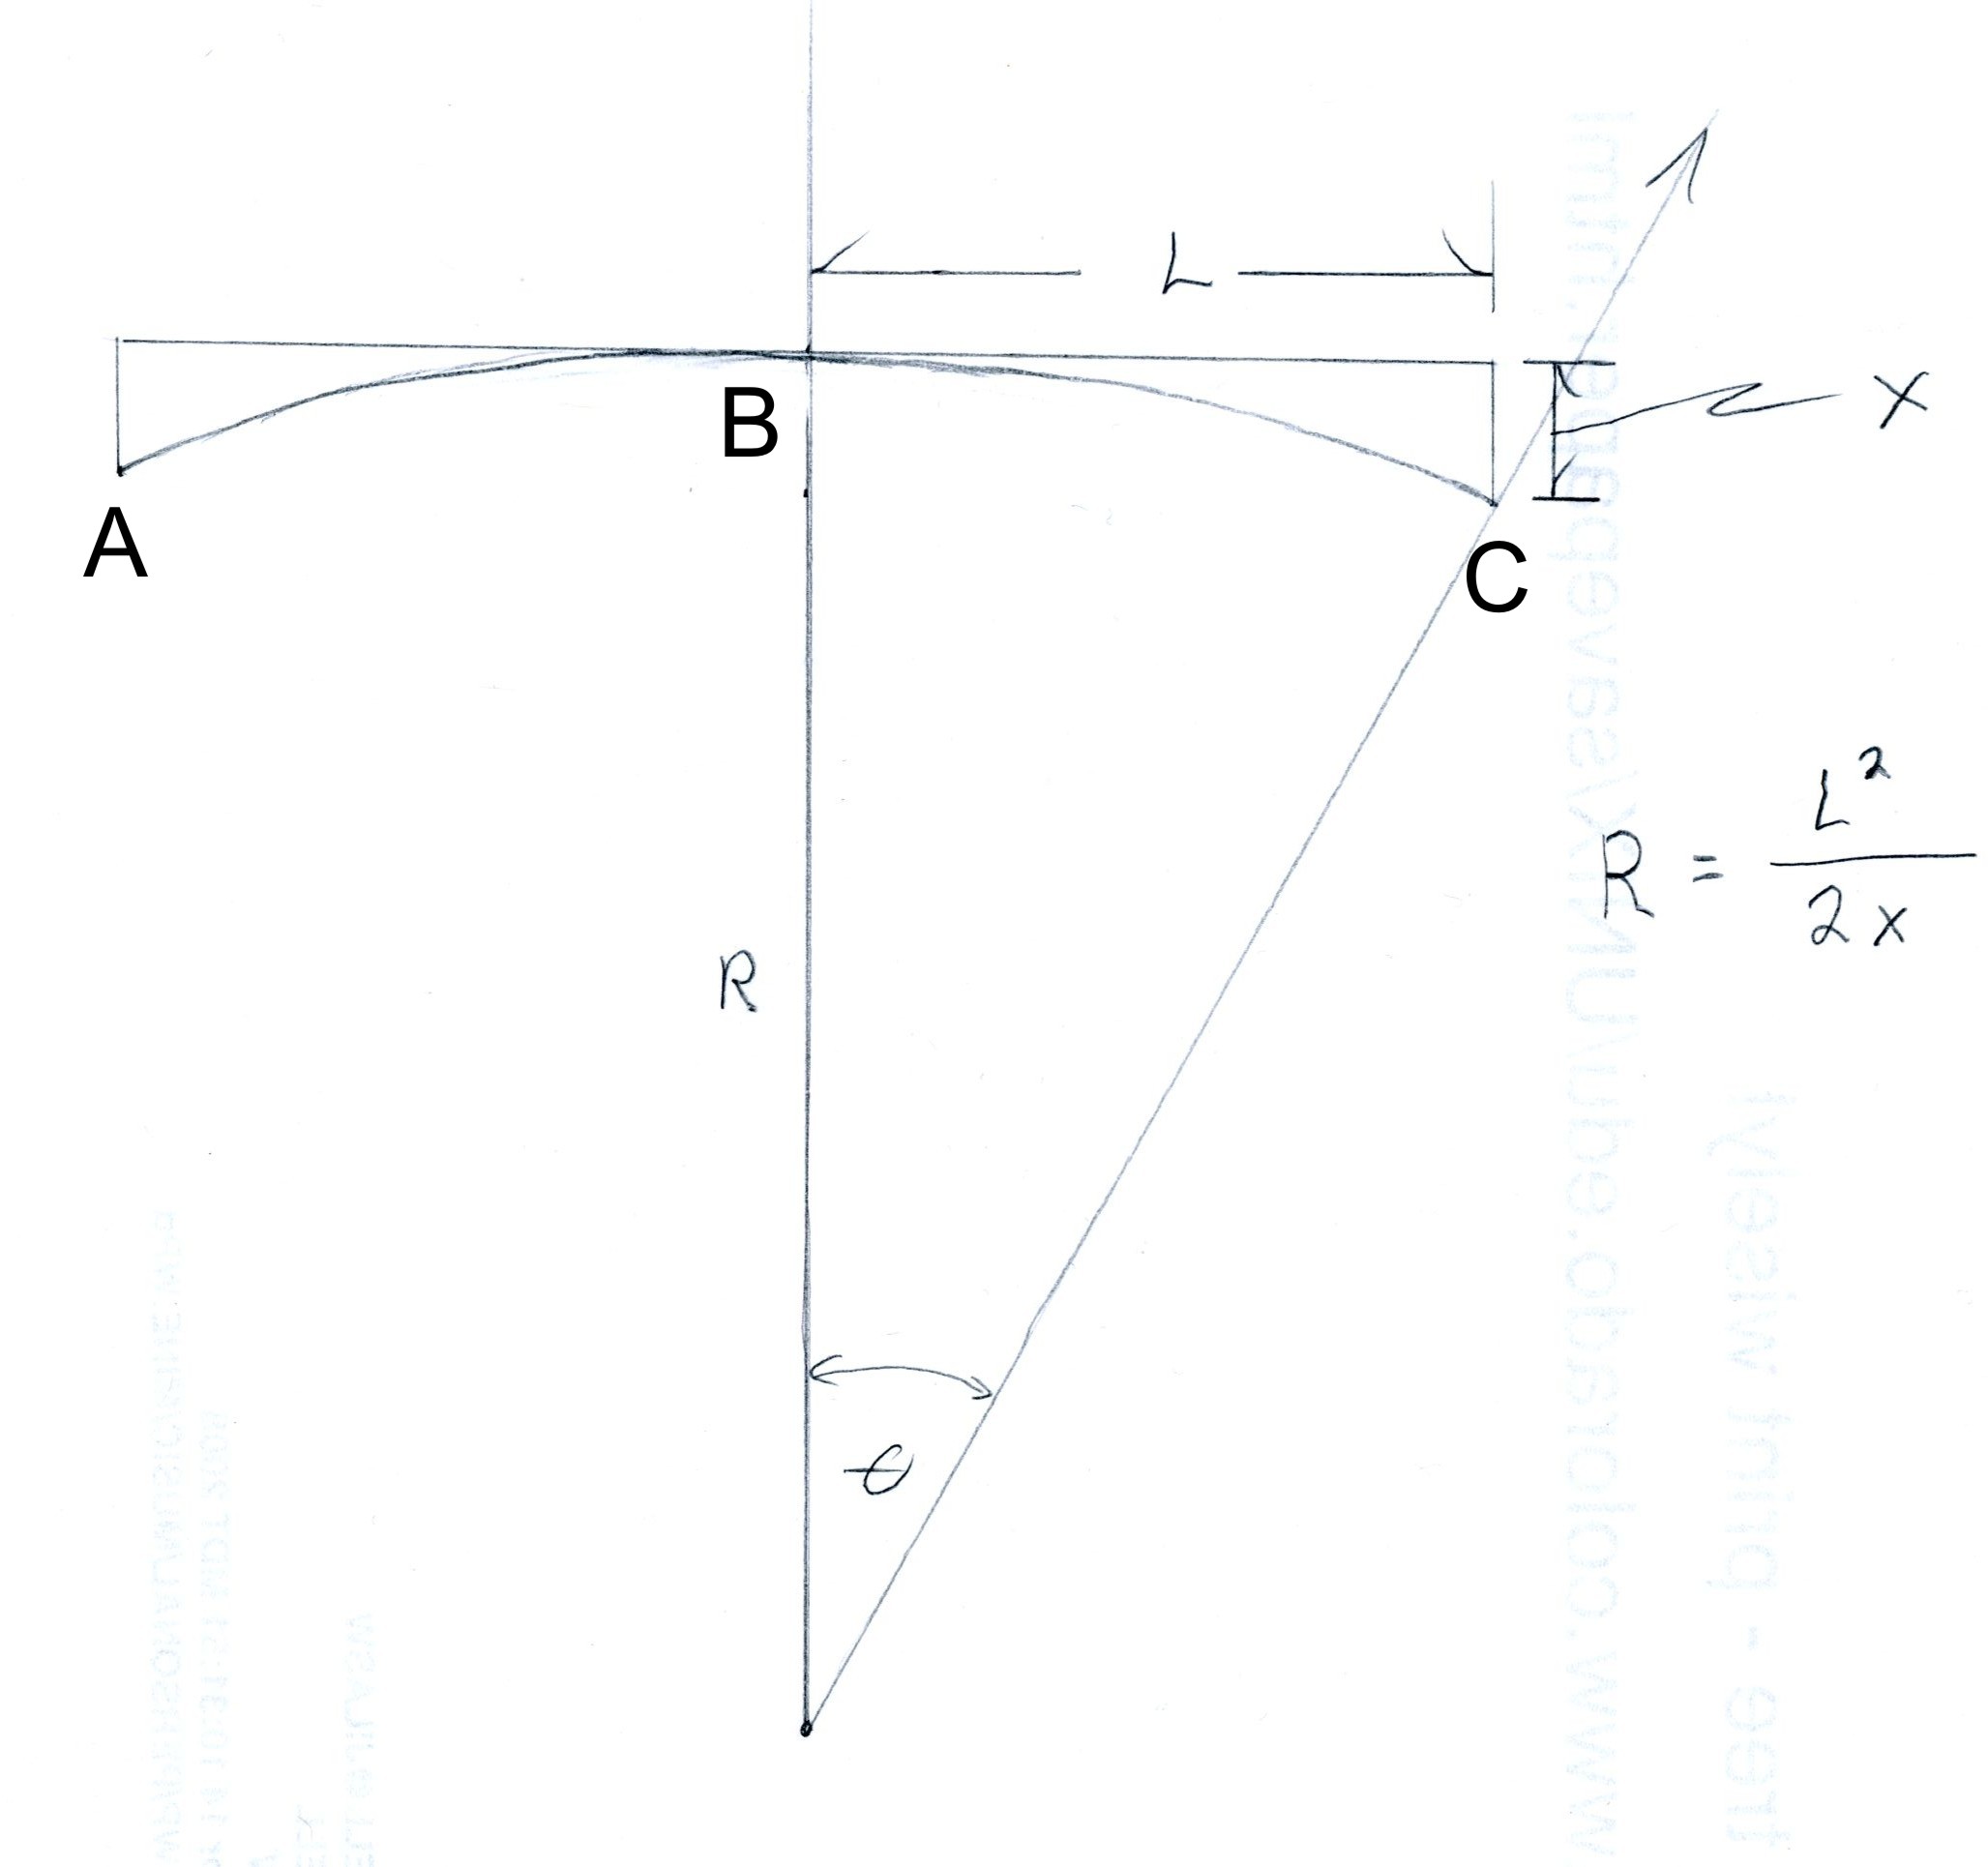
L is one half the diameter of your desired hollow form. My value of L will always be 12", or half the diameter of 2' which is the size of all my rounds. Of course, the equation above is organize wrong, what we are actually interested in is what the value of "x" is for a given radius R. Remember that R is the radius of our hollow form which folks usually refer to as 15, 20, or 25 feet, the most common sizes.
Remembering our High School algebra, we multiply both sides of the equation by x to get Rx = L-squared over 2. then divide both sides by R and we get x=L-squared over 2R. Now solving for x with the values of R=15', L=12" goes to (=>) 144/360=x which is 0.40". Remember to convert the radius in feet into radius in inches so that your units match! Similar values for R=20' => 0.30" and R=25' => 0.24".
To make the curvature templates I drew the same kind of drawing as above on some heavy paper but made it to scale for L and x. No need to draw in the R line, just mark the center of the curve. I then drove in a fine finishing nail at the center point B and bent a rod around the nail to make the smooth curvature flexing it to align with the end points at A and C. More finishing nails in to hold it there and then I traced that to the paper to make the curved line ABC of the proper radius. I used a fiberglass rod from an old bicycle flag, don't use something like a maple dowel since it isn't homogenous and won't make a smooth curve. A flexible piece of drill rod would work too.
I then screwed the two rail piece blanks together, these were just some 1x2 doug fir pieces of the length to match my jig (see below). Make sure you put the screws in places where you are not going to be cutting the curve. I glued the template to my rail piece blanks and cut them out on the bandsaw. I then smoothed the cut surfaces by sanding and unscrewed and separated the two rails and marked them as to their radius.
Here are some additional rails, you can see the difference in the curvature.


Making Round Blanks:
I made most of my rounds out of MDF (Medium Density Fiberboard) since it was relatively cheap and I thought it would be nicely stable. This turns out to not be quite right. I suggest, and I too will do in the future, that you use some form of plywood, preferably some of the multiply birch plywood. The problem with the MDF is that as you rout it it must relieve some sort of stress in the board and it tends to cup up. For my full sized hollow forms that I use for sanding and in the go-bar deck I made them double thick by gluing on a second flat disk after routing the curvature in one. Further, MDF really needs to be sealed well and it sucks up a lot of finish. This is particularly important for forms that you intend to use with stick-down sandpaper. When you remove the paper it wants to rip out the MDF.
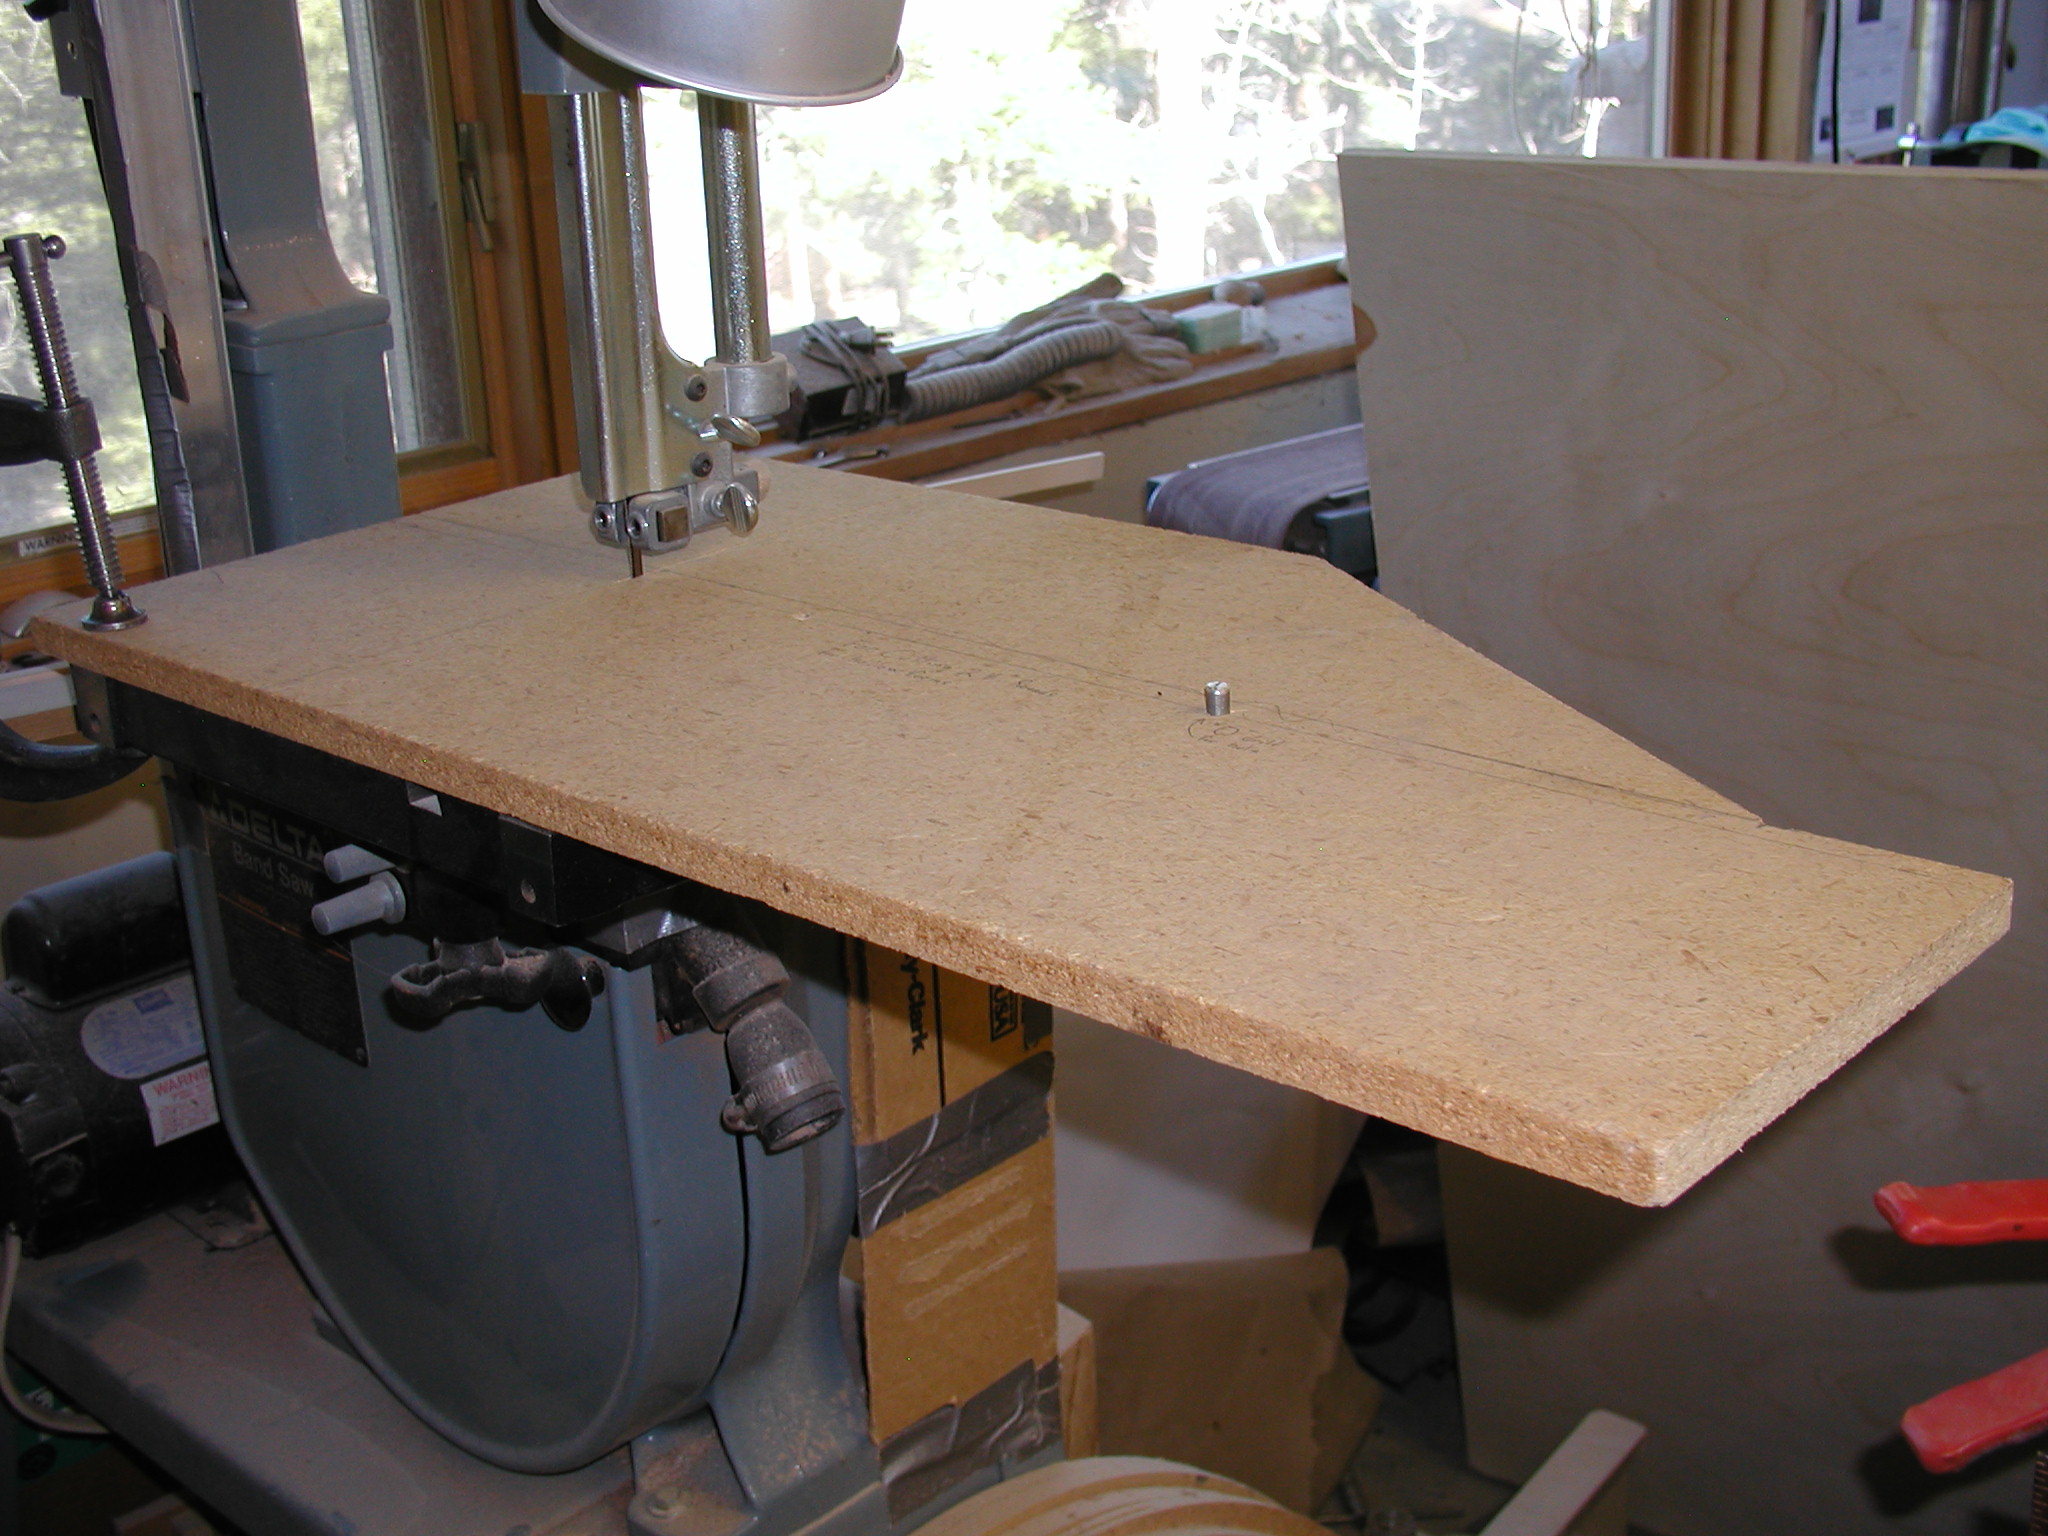
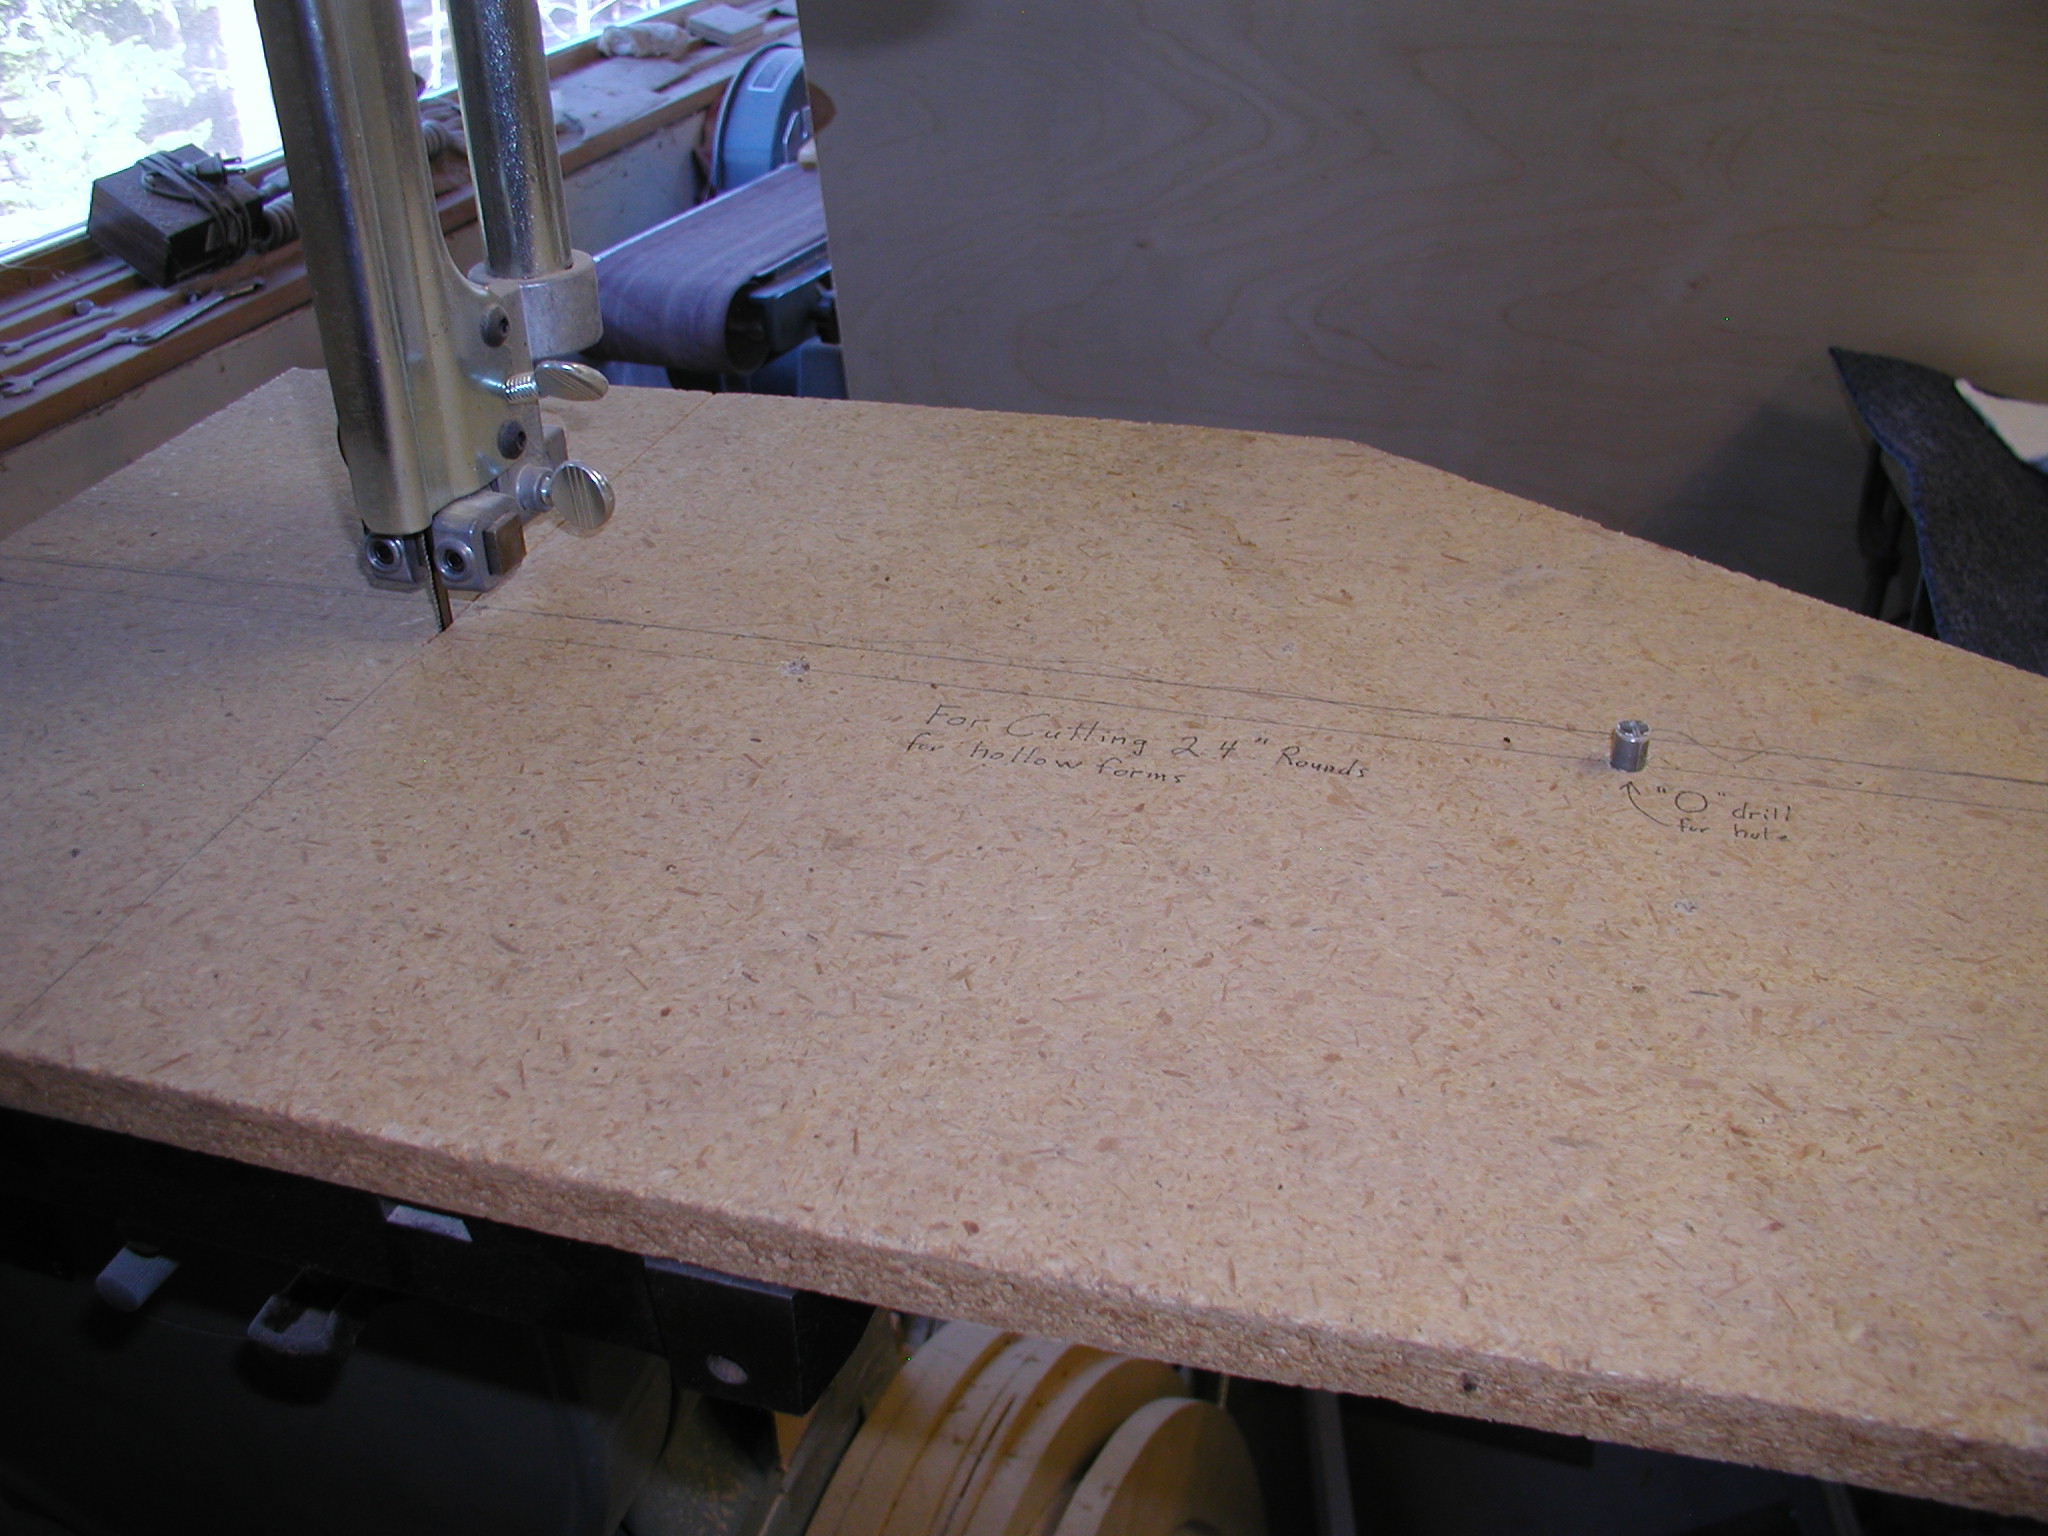
If you purchase a 4'x8' sheet of material, cut it into 8 2'x2' squares. Then locate the centers of each piece and drill the proper sized hole to match your router jig center pin. Make this pretty snug, you don't want much play when routing. Now cut the squares into circles. Yeah, sure. Just how do you do that? There are a lot of clever jigs for making circles, that can be as simple as just making a circle with a pencil on a string and cutting out with a jig saw. Since I have a bandsaw, I just used yet another high quality piece of scrap and made a cutter for use on the bandsaw.
The board has a slot cut into it from the back side to provide blade access when clamping to the bandsaw table. I then drew a center line and measured out one foot, one half the diameter of my rounds, and mounted another aluminum tubing pivot pin. You start the saw, slip one of the squares onto the center pin with the edge of the saw blade to one of the flat edges, it will just fit. Then rotate the square and it will cut it into a round. Easy as cake! (or something like that?)
Usage:
Do your routing of the disks out of doors or in a place that you don't mind having completely covered in router dust and chips and that is easy to clean up after. This is especially true of the MDF which seems to increase in volume by at least three somehow. A good breezy day on the driveway is a good idea and makes cleanup easier later on. You will want to wear a coverall and a hat and a GOOD dust mask. Do you get the idea that this is a messy process? Also have on hand a pair of leather gloves.
Slip the round onto the center pin and make sure it rotates OK and is seated fully down. Put a 1/2" double edge straight router bit in the router. Now position the router onto the rails right near the outer edge of the disk and adjust the height of the bit so that it is just touching or just off the disk. This will make it so that the curvature just finishes at the edge of the disk.
Lift the router off and start it. Then lower it onto the disk at the center. Now you see why you want the taller router side guides. You can do this by getting the router into the guides while tipping it a bit, them slowly lower it into the work. If you have a plunge router and the plunge base doesn't get in the way of the side guides use that. Start cutting from the center and as you slowly pull the router towards you with one hand, rotate the disk below it with the other. Just a little bit at a time and you can handle the router one-handed just fine. You will soon see why you want the leather gloves. As you get about a third of the way out the router will begin to drive the disk and rotate it for you. Very cool, eh? NOT! Watch out that it doesn't really get going by applying drag on the disk with the gloved hand. If it gets too toasty just pause for a minute.
When you have it all cut, return the router to the center and do it all again. This will pick off any odd or missed areas. Last of all, take it out and hit it with a random orbital sander or finish sander with some 220 grit to smooth it all. Then finish it will some shellac or whatever you have around. Just enough to seal it is good enough, it doesn't have to be glossy and pristine.
Suggestion:
If you know other builders in your area you may want to go together on this project and share the jigs around. I loan this jig out to folks in the Colorado Luthiers group. Since it is a bit of processing and kind of a mess, it makes sense to all get together and just make a party out of it and spend the afternoon making disks and routing and sanding and finishing. You can run off batches of the various radii with folks rotating around the different tasks to avoid fatigue. And it is a good excuse to have a Bar-B-Que later.
Alan Dunwell