![]()
Okay, I promised I'd show how I make my finger planes. There are many ways to make these, I'm sure, But the following method works well, and is very easy.
We'll start by rounding up some hardwood scraps; I'm using maple here, in the photos, but any hardwood will work well.
Here, I've ripped a 20" length of maple to 3/4" square on my table saw; a band saw will work well, too.
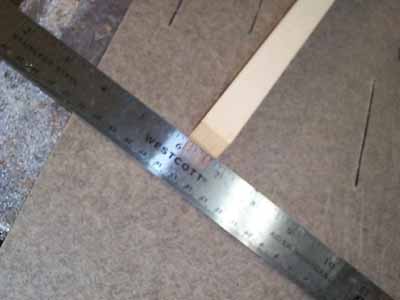
Now, I head to my miter(chop) saw, set it to 30 degrees, and carefully cut the end.

Now I'll mark 3/4" from the long side of the angle, and cut it off, with the miter saw set at 90 degrees.
All of these cuts can easily be done with a miter box and backsaw, too.
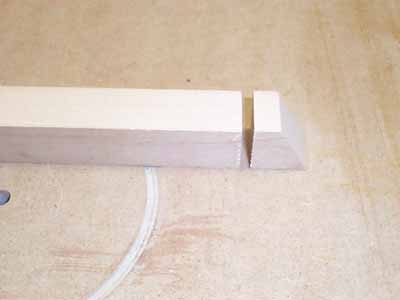
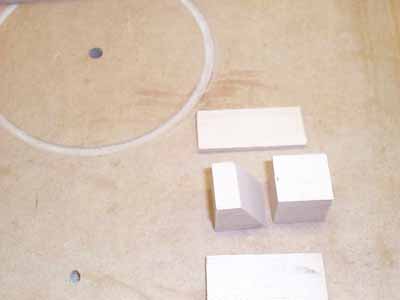
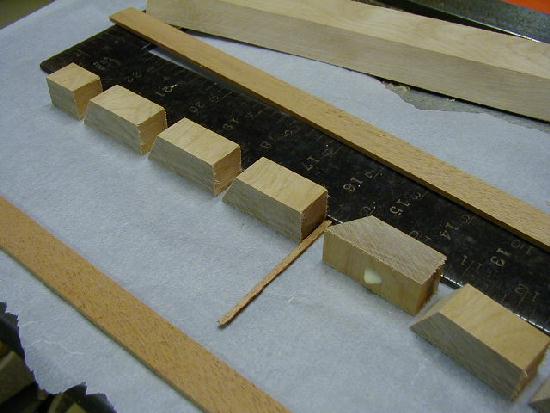
Now, I'll cut a square piece at 3/4" long(giving me a 3/4" cube).
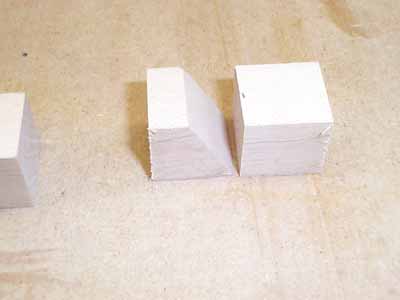
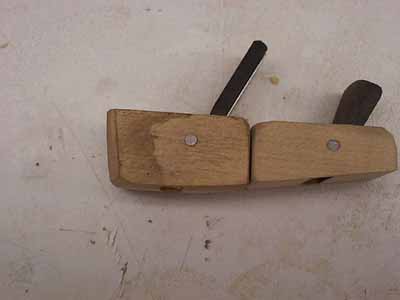
I've laid out the pieces in the photo in the order they were cut.
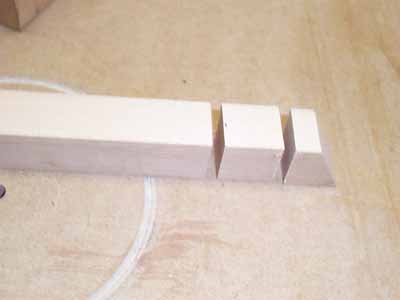
Now, if I move the second piece in front of the first one, we can see how it will work.
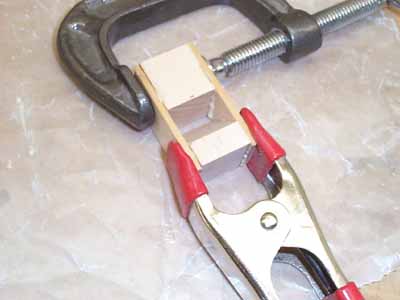
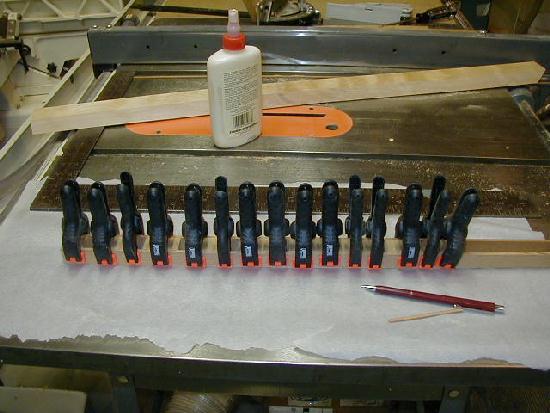
Next, I'll rip some pieces of maple to about 1/8" thick by 3/4" wide. I'll cut off two 2" long lengths of this material to use as the sides of the plane.
Here, all four pieces are laid out as they will fit.
Using a couple of clamps, the four pieces are glued up to form the plane's body.
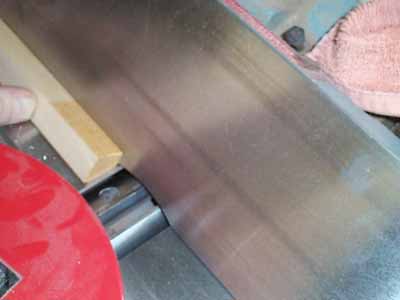
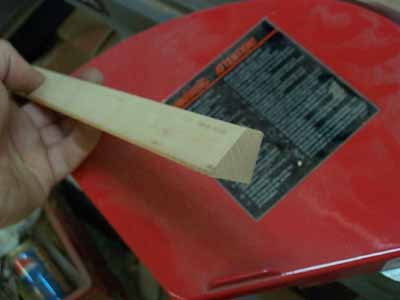
That's it for now. After the glue has dried, I'll take it to a belt sander, and quickly true up all the edges. I won't shape the bottom yet; that will be done at a later stage.
Now, the above is fine if you only want to make one or two, but if you wish to make many planes, we can do it differently.
Taking another 3/4" square piece, we can cut a 30 degree bevel along its entire length, either with a table saw, by titling the blade, or even using using a jointer. USE A PUSH STICK!!!
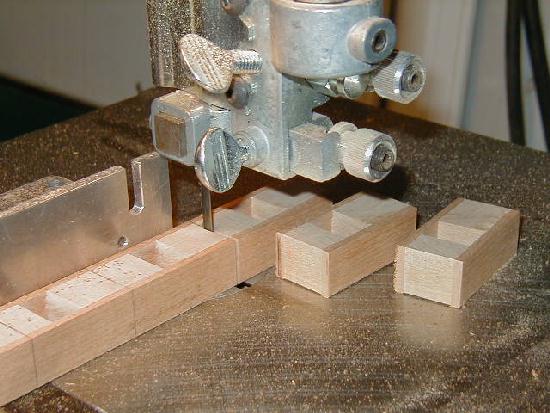
What we end up with(using whatever method works best with the equipment you have on hand) is a length of stock that can be sliced to make up the rear blocks of many planes. A few minutes at the miter saw or miter box will yield dozens of plane halves!
Combine these with some 3/4" square stock sliced to the same thickness', and you can see how quickly we can have a toolbox full of planes of all sizes and radii.
Tomorrow, I'll show how to finish these little buggers off. Not much more to it.
Really cool Mario! The 30 degrees is apparently off of
90 degrees, which gives you an actual included angle of closer to 60 degrees,
probably better for highly figured woods, but lower angles would be better
for the soft woods, say somewhere around 30 to 45 degrees.
Yes, lower angles are handy, too, but this one seems to be the best all around one; works like a well tuned scraper at times. And by playing with the sharpened bevel on the blade itself, we can get many other angles. I also have some lower angle planes that I've made, but I've found little use for them. The planes are so easy to make that I would encourage everyone to experiment with the angles and dimensions to find what works best for you. Honestly, it's possible to make 20 or more planes in an evening's work, so finding what works and what doesn't is simply a matter of trial and error; still, those planes that don't work with one type of wood will likely be just the ticket for another.
And as we'll see tomorrow(today?), we can get other blade
angles from this basic setup, by simply holding the plane's body at angle
while truing the bottom.
Ah-hah! That explains our earlier conversation where I
was thinking that 30 degrees was low angle. I was coming from the 0 and
you from the 90. Now that I see your method it also explains how to deal
with making and ebony sole for long wear. Who needs it! If it starts to
wear out just whip out another dozen or so! Very nice technique.
Actually, I have enough ebony off-cuts that I could make
a few planes completely out of ebony if I wished.
I've been thinking of buying a few African Blackwood
tunring squares and making planes from it. It's a very heavy wood, and
the extra mass would be nice. Cocobolo would also be excellent.
But, as it is, I've yet to wear out any of my current
planes, most of which are made of relatively soft birch.
What size port/throat are you using on these assuming
the use of scraper blades as the eventual irons? In the picture #7 it looks
like about 3-5mm, right?
Yeah, 3-5mm will do. I've never measured it, but that
seems about right. When you make the planes, make the throat small, and
you can always open it up afterwards if needed.
Now you tell me! OK, what about holding the blade in?
How about a train of planes? I made a slight modification on Mario's great method with mass assembly in mind. I took a piece of maple that is 3/4" thick and about 2" wide and angle cut one edge to 60 degrees on the table saw. I then chunked off 3/4" pieces of this and laid them in a row. I took one piece and cut it in half to make a 3/4" block and put that down first, then the full sized pieces, then the little angle piece last. In this image you can see I am gluing them down onto a scrap piece of paper with a dot of glue, using the framing square to get them in a line, and using a small scrap of wood to position for the throat gap. You can see the large angle-cut chunk in the background and the mahogany side strips also laid out.
Next I glue on the mahogany side pieces with a zillion spring clamps. Since the pieces are glued to the paper, I just tilted the whole group over on the side, applied glue to the blocks, then the side piece. Flip over on the other edge and repeat. This avoids smearing glue in the side pieces and ending up with a bunch of goober showing in the center area.
Once the strip of planes was dry, I leveled the top and bottom on the belt sander. Then I marked off cut lines to make different length planes and whacked them off on the bandsaw.
Here is my fleet of roughed out micro planes waiting for Mario's instructions on how to fit the blades.
Hey Alan, could you just send me a couple of those! ;-)
Enjoyed your production method, thanks for posting --
I need to wrap up my current projects and get busy!
That's great! I'm glad you're seeing past my method, and getting ideas on how to improve on it.
I'll take some photos today of the rest of the process.
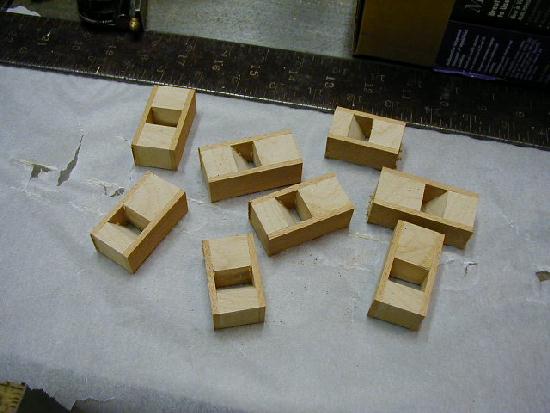
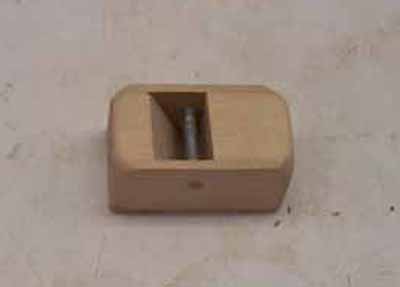
Oaky, here I've rounded over the top edges, and trued the bottom of the plane only enough so that it's flat.
The pin that you see in the plane is a roofing nail; any
nail or pin can be used, but I like these since they have a rough texture
to them, and are a little over 1/8" in diameter, so they fit perfectly
in a 1/8" hole. Drill the hole about 3/8" up from the sole of the plane,
and about 1/8" to 3/16" from the sloped surface that the blade will rest
on. These dimensions aren't too important, as you'll be making a wedge
to fit it anyway.
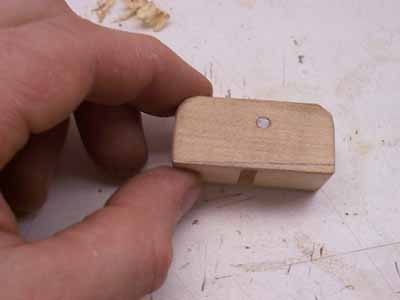
Cut the pin a little proud of the body, and sand
it flush with the body when you true it up on the belt sander.
If you don't have a belt sander, as I did until three
years ago, you can make-do by buying a few sanding belts, cutting them
open, laying them flat and clamping them at each end to your workbench
with a C clamp and a small block of wood. You can also double stick tape
the belt to the workbench, but it's messy when it comes time to remove
it.
You then move your work on the belt, and it does
work very well indeed!
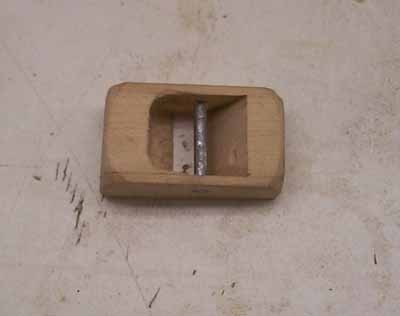
Here, I've drilled two holes and then chiseled out the rest of the area for some chip clearance. I leave about a 3/32"(2mm) ledge at the bottom. I then take a small file and put a light angle on the ledge to prevent the chips from hanging up on it.
Now that I think of it, this step could also be done when we are making the little blocks, before gluing up the body! Ah yes, we learn by teaching <g>. As it is, though, it takes only a minute or two to chisel out the area.
The throat opening on most of my planes worked out to be 3/16"(4mm); anything near that should be fine.
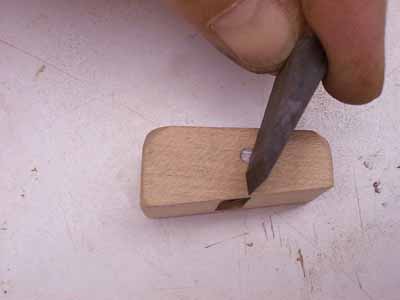
Now well make a wedge of the hardest wood you can find; I use ebony because I have some, but any hard wood will work, the harder the better.
Make the wedge to the same width as the interior of the plane; the better the fit, the better it will work.
Again at the belt sander, shape the wedge to have a tight fit; let some of the wedge protrude beyond the sole of the plane. When it fits well, mark off the bottom, and sand it to the line; now, sand another angle into the wedge; this angle is to prevent the chips from hanging up on it. With the blade in the plane, the wedge should just come up short of the sole.
Round over the top of the wedge, as you'll likely rest the palm of your hand on it as you work. I make my wedges so that they contact my hand between my thumb and first finger; this is comfortable for me, and gives me good control.
For a blade, any hard steel will work; I like to use scraper stock, with Lee Valley's mini scrapers being my favorite. Hacksaw blades, old files, old handsaw blades, etc... will also work well. Look in the archives of the forum proper for more ideas if you wish.
For sharpening, you're on your own <g>. I'm still learning
myself, and since every plane is different, we should all just try to sharpen
at something that works.
For my planes, about 25 degrees is a good starting
point, and the bevel is towards the rear of the plane, too, by the way.
Now, if you want to change the angle slightly on a plane you've already made, just mark it on the side, and re-shape it. On this one, I took the angle down another 10 degrees or so, and it really does work better in the softer woods, which makes me think that an included angle of 40-40 degrees would be perfect for spruce, as Michael noted. Funny, I had tried this before, and it didn't work as well; guess I hadn't sharpened the blade enough.
When I'm just about done shaping the sole, I'll insert the blade and wedge, with the blade just flush with the bottom, and then true them all at once. This gives us a perfectly fitted blade, the easy way, and starts the sharpening angle, too.
That's pertty well it, methinks. To use the planes is simple; adjust the blade roughly to where you want it, and tap in the wedge.
Now, the cool part! If you wish more blade, tap the front
of the plane on your workbench; since the blade is the heaviest part of
the plane, it will move forward ever so slightly. If you want a lighter
cut, just tap it rearward.
This is very handy while working, as you can easily,
with one hand, constantly adjust your blade, if you wish, while working
away; no need to stop and adjust some knobs. If you hit an area of the
back that is harder, or more figured, it takes only a moment to adjust
the blade.
Here is the new plane I made to photograph for here, and in front of it is my workhorse; you can see how curved the sole is; this plane is really pretty well all I ever use, now.
And don't forget that my dimensions are just for starters,
there's no limit to how large or how small these can be made.
Sorry, here are the two planes.
One item that helps in the absence of a belt sander, is
a sanding plane made for working with drywall. It has removeable sandpaper
that is held in clips at either end and is approximately 3.5" x 9.5". The
handle fits very nicely in a bench vise and holds the paper horizontal
and flat for use. Easy to change paper, and cheap.
Stephen, that's a good idea. I often use a sanding block
made of MDF that will accommodate a 9 X 11 sheet of sandpaper wrapped around
1 1/2 times. That gives 3 flat surfaces of the sand paper and a good 3/4"
edge to sand with.
And? Has anyone made a working plane yet? Any problems I didn't address?
I've been playing around with the angles, it it does seem that a much lower angle works better, but it needs to be sharpened to a finer degree. The lower angle planes will cut through soft woods much better, while the sharp angle planes work as scrapers in the figured maple.
Nothing wrong with having a variety. and don't forget
to make them in different sizes, too. My smallest is about 1/4' wide by
3/4" long, and was great when working the scroll area. Now, if only I could
find it.......
I've got two that I made from my fleet. However I found that drilling and carving out the relief for the chips to be a chore. Notice that with the method I used to mass produce the internal blocks this makes the grain of the blocks run side to side. When I try to carve out the chip relief it wants to crack all the way to the sole of the plane.
I have used your further suggestion and I dadoed (is that a word?) out the chip relief ahead of time in the board that has the 60 degree angle cut. The dado is on the other end. Now when I cut off a chunk it already has the chip relief. I need to do a glue up and saw off of another fleet of these.
I used the mini scrapers for the irons but found that
sharpening the angle on them to be a challenge since they are so thin.
They do work but don't seem as sharp as I'd like them to be, they kind
of need a real push to do the cutting. I also have some regular scrapers
that are thicker that I planed to cut up for plane blades but I haven't
figured out how to cut them. Maybe a stone in a dremel tool? Suggestions.
Yes, the dadoing(is _that_ a word, too?<g>) of the forward half ahead of time will make it much easier; I'm learning as I go, too! It's never taken me more than a couple of minutes to make the relief, but if it can be done ahead of time, bonus!
My oldest brother is a welder, and I used his cut-off saw to slice up a scraper and an old hand saw. Maybe you could find a local welder or machine shop to slice one up. A cut-off wheel in a Dremel will work, but it'll take some time.
Another way would be to buy replacement blades for the
Ibex finger planes. Nothing wrong with cheating a bit <g>.
I have built two planes but haven't made the blades for them yet. I ordered the mini-scrapers but they haven't arrived yet. I am planning on using the Dremmel to cut them. Is there a better way?
I have very little experience using planes so I was hoping
to practice before starting on the top and back.
The mini scrapers are thin enough that they cut easily
with the Dremel.
I made 2 and used a steel hinge piece sawn in 2 to make
the blade as it conveniently fit into the space under the wood wedge. The
blade doesn't remove that much material when I use it and I don't know
if I need to set it depper or make it sharper.
Hi folks -
Ok, this is probably blasphemy, but.. 2 years ago, I put together a contour drawing of the mando top and back, based on the Siminoff plans and measurements. What this looks like is a a plan view of the top, with successive contour lines for every 1/8" of "elevation". I do hope that makes sense. I then printed those out on a lazar printer (as inverted images), and ironed the images (using my dear wife's iron - please don't tell). This transferred the image directly to the top or back.
I then free handed, with my trusty router, each successive level.
So, for example, on the back of the soundboard, I started at the innermost contour, and routed the "deepest" contour, then raised the bit by 1/8" and routed out the next contour, etc. etc.
The top of the soundboard starts at the outer contour (deepest cut)) and proceeds by 1/8ths to toward the center contours.
After this "roughing out", I used the sanding disk to smooth out the sections, using the contoured excavations as a guide.
I know, I know, this is totally cheating. I have bought a cute little Ibex plane for this course and project, but... is there something truly evil about this approach?
I'd be happy to share my contours if anyone would like. I've not done them for the stewmac based plans, but I could...
Maybe..we could use contours, and then use planes to do all of the "real" arching??
what say y'all...
Gang, I've had an oversight pointed ou to me.
In post #6, I say "Next, I'll rip some pieces of maple to about 1/8" thick by 3/4" wide. I'll cut off two 2" long lengths of this material to use as the sides of the plane."
While that is correct, I forgot to say that the sides
are oversize, and that the extra will be trimmed on the sander. We glue
up the blocks so that we have a 3/32" to 3/16" throat opening, and then
trim the excess length of the side pieces afterwards.
Hi David, I must say that is a unique approach! You did not have any problems freehand gouging one level into the next level? What diameter bit did you use and how many levels?
Even though I probably would not use it for this class (maybe not quite in the spirit(?), might miss the satisfaction of working with a plane, I'm doing an A stlye - and I bought a cute Ibex plane too!<g>).... I'd still like a copy of your contour map to at least give the technique a try.
How'd that mando turn out?
cheers,
David:
The technique you describe was detailed in GAL....There was great article about step-routing your mandolin plate by building a shallow box then attaching the plate to the bottom. You then mount your router to plexiglass and set it so that it rides on the rim of the box.(very Safe) Contours are outlined onto the plate and depth is adjusted from bottom/surface of box up. This has been the easiest way to get an accurate edge thickness around the plate that I have found AND gets rid of alot of the excess wood....I don't think its cheating...There are enough areas of this instrument that will require slow meticulous work...save all the blisters and cuts you can!
I will look up the article and post the name if anyone
is inetested...Michael/Mario---perhapsyou are planning on teaching this
technique already?
Michael will be teaching the carving methods; I'm just helping out, here <g>.
I don't think that any method is 'cheating'. I've used a safety planer to to the step thing once or twice, and still use the method to define the edge thickness.
Spruce is such a joy to carve, though, that you're depriving yourself of one of the most satisfying parts of the instrument making experience.
Again, we're getting ahead of ourselves, here <g>.
ok..here is one of them...
looking through the archives on this silly computer...
dlb

wow..that came out pretty big..sorry folks..
I have the top and back plates carved from this method, all but the scrolls. i can post photos if interested.
I do plan on hand planing for the class - I couldnt figure
out how to do it before, so I had to invent.. now.. we have Mario and Michael
.. thanks guys.
Please note that the Siminoff body outline isn't correct;
we will be following the outline from the Stew Mac plan, as it's about
a perfect replica of a Loar mandolin. I say this now because you stated
that you took those outline from the Siminoff plans.
Please be aware that our image size restrictions need
to be observed back here, please reduce your images to 50k or less. David,
your image is over this limit. Thanks.
Mario or Michael, is the GAL Loar F-5 plan accurate? I
don't mind buying the Stew-Mac one if it's better, but I already have the
GAL one lying around.
The scrapers I ordered arrived yesterday, I finished up my planes last night and tried them out. I had a few problems but I think most of them stem from the wedge being a little too narrow.
One thing that I'm a little puzzled about is getting the blade depth set properly. When I push the wedge in, it pushes the blade out farther. A couple of times I got it set about right but when I used the plane I must not have had the wedge in tight enough and the blade moved back up.
Any tips on getting the blade set properly Mario?
Doug, try holding down the plane on some scrap softwood, push the blade down, and then tap the wedge in place. This should leave you with a slightly protruding blade, at almost the right depth.
To fine tune the blade, tap the plane on the front by dropping it on the workbench to increase the cut, or tap it on the back to lessen the cut.
If the blade won't hold, you may have too steep of an angle; a shallower angle will lock the blade more securely. That, or you're not setting the wedge in tight enough. A light rap with a hammer will set it tight.
Hal, I think the Ted Davis(GAL) plan is okay, too. It's
just that Siminoff has a weird outline; the points aren't right, and the
entire mandolin, as a whole, doesn't 'look' right. I'll compare the two
plans later today, but I really do think they are close.
I have made one plane so far....and I'm going to make
more before i start carving any mandolin.
Instead of a wedge, I used a 1/8" thick piece of brass.
I drilled a threaded hole on it to match a small knob with 1/4-20 threaded
shaft on it. So I can tighten it down on the blade with the screw in the
knob...but these new planes I will make just like Mario suggests.
If you wish to build them, the thumbscrew plate is superior,
except that you must stop to adjust it.
Right...I forgot to mention that I filed a groove in the
brass for the nail to sit in. This keeps it in one place.
Doug R., I found that if I didn't get the wedge top and bottom surfaces exactly flat to each other then the blade would slip, especially on one side or the other. In other words, make sure that when you sand or shape the wedge that there is _no_ wedge or angle side to side.
I cut up a standard rectangular scraper to get some slightly
thicker blade material. This is about 1/32" which is about twice as thick
as the mini-scraper material from Lee Valley. I found that this could be
cut on a standard sheet metal shear (not tin snips, they curl the material).
The metal is not so hard that the shear had any trouble with it. I'll post
some photos as soon as I get another digital camera.
Hal, I just checked the Ted Davis plan against the Stew-Mac,
and they are very close. Go for it!
Thanks for checking, Mario!
Hi All: I just tried cutting up an extra replacement blade
I had for one of my Stanley block planes. I used a Dremel cut off blade,
making a one inch cut in about a minute. I should get 4, 5/8 inch blades
and 2, 3/4 inch blades.Yesterday I recieved a sitka spuce and an engelmann
spruce top from Bruce Harvie. They are supposed to be seconds, but they
sure look good to me. I see no discoloration and quite a few lines per
inch. He did me right. Getting excited about this course.
I know I'm coming in late on this discussion (just got
back from NAMM) but there is one discrepancy that I know of with the Ted
Davis Plan, and that is that the neck joins the body one fret short of
the Loar design.
News Flash!!
Date-line - Colorado
Local Luthier Loses Control, Run Amok.
Reported yesterday, local mild mannered luthier Alan Dunwell
seemed to lose control while building some finger planes. It started late
in the day as he was building one plane for making mandolins, but this
innocent activity quickly went awry and got out of control.
"I just couldn't seem to stop myself." he said when interviewed
this morning, "First I made one, then I made another, and another....<sobs>...Really,
I just didn't know what I was doing."
Sounds like an innocent case of planoacretion syndrome
but this has happened before.
"He just disappears into the shop and won't come out."
his wife said. Sometimes I just have to put a bag over his head to quiet
him down, kind of like the parakeet, then I can lead him to food and get
him to go to sleep."
Further details are not available but it is believed that Alan has checked into the Betty Ford Center for Toolahaulics, we hope for a quick recovery.

Too cool!
And? How do they work? Did you try different angles yet?
Poor Alan, he seemed to show so much promise . . . . <g>
Alan, you should be writing for some big time outfit and making the big
bucks! Let us know when you get the planes sorted out and humming along.
Mario, they seem to work quite well. I am using the cut up thicker scraper for the irons and they seem to take a better edge than the mini-scrapers, at least for me and my old age eyes when sharpening.
I did make some in 1/2" width and I set them all to the initial 60 degrees. But then I cut the soles at different angles so some have lower angles and some are curved sole and one is a convex sole.
Yeah Michael, I had to give up all that fame and fortune
for the compelling life as a luthier.
David, thanks for posting your contour map - very interesting, I also went back and found I had the GAL article describing same. I'll file it for future reference.
Allen, that's the problem with making rabbet planes, they multiply like crazy! (Har!)
Sorry.. :) ...will be interested to hear how the various planes and blade materials hold up.
![]()
![]()
![]()
![]()
![]()
![]()
![]()
![]() Musical Instrument Makers Forum
Musical Instrument Makers Forum![]() Mandolin Course
Mandolin Course![]() Making finger planes
Making finger planes
| Your purchase
from these sites helps support the MIMForum,
but only if you start at the links below!!! |
|||
 |
 |
 |
|
| MIMForum
Bookstore |
MIMForum
Tool Store |
||
Choose Your Preferred Search
Engine:
![]()

